Friday, July 26, 2024

Drawing and Painting My Shy Dog, Snowy


     I titled this piece as Snowy Smiles, because she normally doesn't. This was one of those rare instances that I caught her smiling that I took my camera phone right away to capture that moment.  With that, I decided to make her my next subject for a dog painting after Gabbie.  

      Just like before, I started the painting with a line drawing,  keeping close attention to the proportion, light and dark patterns and shapes. In achieving likeness, the constructive drawing method can be used but that would have taken me longer.  Instead, so I looked at shapes, but with an understanding of the animals anatomy and form construction. They are still useful when checking and judging the solidity of the subject.  

     The sketch started out rough. I marked down the overall shape, layout and proportion first. Then I progressively modified, erased, and cleaned-up the lines as I go.  I'm still not as confident in laying-down the colors directly. I rely heavily in a good solid drawing to give me some structure before I add color.  Eventually, I would like to paint with color directly.  

      Once the drawing was good enough, I then started adding color. Color was the aspect of painting that I had been so intimidated to do because I didn't understand it enough. In my previous artworks, I usually just glaze the colors over a grayscale drawing  and be done with it.  But it's more coloring than actually painting.  So to fill-in the gaps in my knowledge and understanding of how to use color in painting, I am taking some self-paced art courses about color and light.  Starting with the Cali and the Gabbie paintings, and now with this painting, my process have changed.  With the lessons I'm learning so far,  I'm trying out a different  process. I've completely skipped the grayscale step and went straight to color after the line drawing. Eventually, I would like to try painting straight to color without the line drawing anymore. Till the, I'm quite pleased with the results here so far. 

    Here's a look at that process. 


  And here's a shorter version.


Thursday, July 25, 2024

Drawing and Painting A Yorkie


   Here's my first post in 2024, a digital painting of my cousin's dog, Gabbie, a Yorkshire Terrier dog who is blind in one eye.   I took the photo reference I used here when I had a chance to be alone with her.  She doesn't know me well, but fortunately, she became comfortable enough to remain seated like that. I took my phone out quickly and took some shots.  
 
  The photo was a bit dark because of the light behind her. So I adjusted the levels to brighten it a bit, so her face would be more visible.  I took my time in the drawing stage, keeping close to her likeness as much as possible.  A lot of erasing, adjusting, redrawing happens at this stage. Once I'm happy with the line sketch, that's when I proceeded to paint in color.   
 
   I stayed as close to the color in the reference as possible, but I allowed myself to deviate a little bit.  I added the colors layer by layer, building it up slowly.  And as a finishing touch, I exaggerated the intensity of the backlight and added some bloom around the edges. 
 
 
 Here's a look at my painting process of this Yorkie dog. Enjoy!


Here's a shorter version:


Monday, May 15, 2023

Husky Painting Process From Line Drawing To Color


 From line drawing to color, digital painting of a husky named, Cali.

 Painting App used: Clip Studio Paint Ex (Desktop edition) 


Song: x50 - Moving On (Vlog No Copyright Music) 

Music promoted by Vlog No Copyright Music.

Video Link: • x50 - Moving On (   • x50 - Moving On (...  https://www.youtube.com/watch?v=yeenow_Bxvo&t=0s


Sunday, April 9, 2023

Draw 25 Dog Poses When You Don't Know What To Draw

Using photos of our dogs, Creamy and Snowy, here's 25 dog sketches drawn digitally and recorded in time-lapse using Clip Studio Paint.


Music: 
Fredji - Happy Life (Vlog No Copyright Music) 
Music provided by:
Vlog No Copyright Music. 
Video Link: 
• Fredji - https://www.youtube.com/watch?v=KzQiRABVARk&t=0s

Friday, March 31, 2023

Lion -Digital Painting in Grayscale

Practicing some grayscale value studies is crucial to my on-going self-directed art studies in the hope to be able to paint in color eventually. This is one of those studies. Over 4-hour painting process compressed to just 6 minutes.


Music Credits: 
An Inspiring Feeling by Tim Taj 
Licensed under: Attribution-NonCommercial 3.0 International License


Monday, March 27, 2023

Painting My Dog, Creamy

 Here's my first post for this year.  A time-lapse video my digital painting process.  All the steps, and missteps, are shown here, such as some fundamental art concepts and some digital tools that I recently learned about.


  For the real-time version of this process, it's available here  https://jocelynsydraws.gumroad.com/l/cpinao


Credits:

Music: Where we go (Cinematic Inspirational Piano)

by MichaelSchullerMusic 

Licensed under a Attribution-NonCommercial 4.0 International License 


Wednesday, August 11, 2021

Repainting My Old Drawing - Raccoon Ninja 2021

       In my previous post last March, I used ordinary objects found at home to create a physical maquette for my Mouse Monk character, as part of my assignment for Dorian Iten's The Shading Course online class.   In that assignment, creating a physical maquette was a great idea-generating exercise. A starting point when ideas seemed elusive.  But in this assignment, the character design was already clearly drawn.  And from this, a digital maquette was created  and used as my lighting reference.  

       Prior to this assignment, I have no experience in using Blender, a free 3d program. But since Dorian Iten used it heavily in his lectures for his online class, I decided to use it as well. Coincidentally, Marco Bucci, one of my fave art teacher, also just released a YouTube tutorial regarding using Blender as a digital painting tool.  It's from this tutorial that I learned some really basic sculpting tools in Blender.  And so I managed to create a simplified digital maquette of Raccoon Ninja. 

       Following closely how my old Raccoon Ninja drawing looked, I set up my character in the same perspective angle and played with different lighting schemes, just to understand how light and shadows fall on a character at different light directions.   See below the four lighting schemes.


        Eventually, I used the lighting scheme similar to what I had in the drawing, which was from behind with the moon on upper screen left.   Having this digital maquette really helped me resolved the lighting of the character and it's environment.  Below was what I submitted to the class for Dorian's review and feedback.


        And here's the final version of Raccoon Ninja.  I'm quite pleased with what I've learned from the course. Dorian had been kind, encouraging, generous, and most importantly, a clear and concise  art teacher who really knows how to teach, 


     Just for fun, here's a look at the different rendering versions of Raccoon Ninja from different periods of my art-learning journey.  


Monday, May 3, 2021

"Untrained Melody"

     This illustration was an attempt to put into practice some of the drawing and painting fundamentals I've been learning so far.  My recent art learning involved some perspective drawing, figure drawing, animal drawing, composition and some color and light.  This was also my attempt to paint straight in color. without going through the grayscale stage and then just colorized the image after, like what I did here.  So for this illustration, I painted the colors in stages. Although every now and then, I would filter out the hues to check the values, whether the overall image works or not. 

     Slowly but surely, my goal of being able to draw and paint from imagination is not so far-fetched anymore.


Tuesday, March 2, 2021

Mouse Monk - From Ordinary Objects To Digital Painting


     Last year, as everyone were sheltered in place due to the Covid19 pandemic, Serendipitously, I just signed up to an online class, The Shading Course by Dorian Iten.  It was a fantastic course about understanding light and shadow, that will ultimately help artists like myself, to render or shade their drawings or paintings more effectively and convincingly. Dorian made the lessons short,simple, understandable and yet very effective.

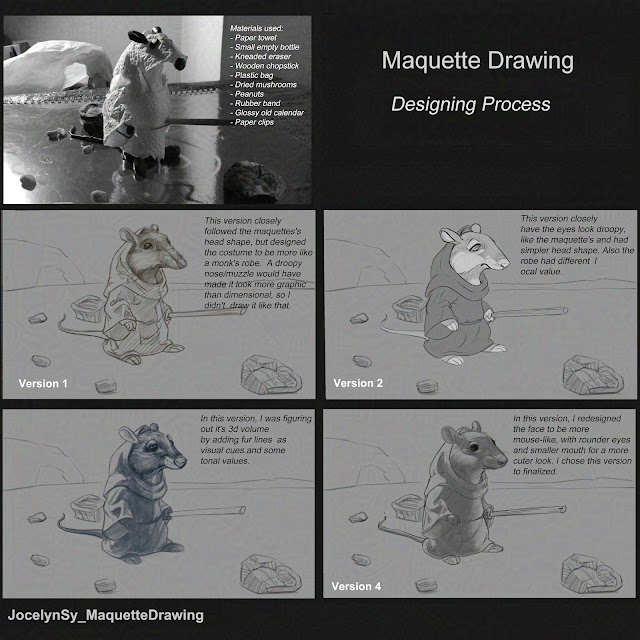
     So for months, I was kept busy with this course,. For the final lesson, one of the assignment was to use any objects found at home and create a physical maquette or scaled-down model, to be used as a lighting reference. The other assignment was to create a virtual 3D model using Blender, a free 3D app.  But since I'm yet to learn how to use Blender, I opted for the physical version.  It didn't have to be any fancy objects, but just ordinary things, like, paper towel, rubber band, paper clips, wooden disposable chopsticks, old calendar, plastic bag, small bottle, kneaded eraser, a few peanut pieces, and some dried  mushrooms and adhesive tape.


       From these, I folded the paper towel like an origami over the empty bottle. After trying out a few folds, I eventually came up  with what looked like a rat wearing a robe. I used a rubber band to hold the paper towel over the bottle in place. As for it's eyes,ears, nose, hands, tail and feet, I molded them using an old dirty kneaded eraser.  For the arms, I wrapped two paper clips bent in an L-shape in paper towel, and attached them to the body using an adhesive tape. Then attached kneaded eraser hands at the ends to complete it.  As an added prop, I slid one wooden chopstick onto the rubber band at the waist and slanted it diagonally to look like it's holding it, then securing it with additional adhesive tape to keep it in place.  It's almost complete.  I placed it over a glossy old calendar and scattered a few peanut pieces and some dried mushrooms to serve a small and big rocks. Then in the background, a plastic bag served as some sort of big rock cave.  

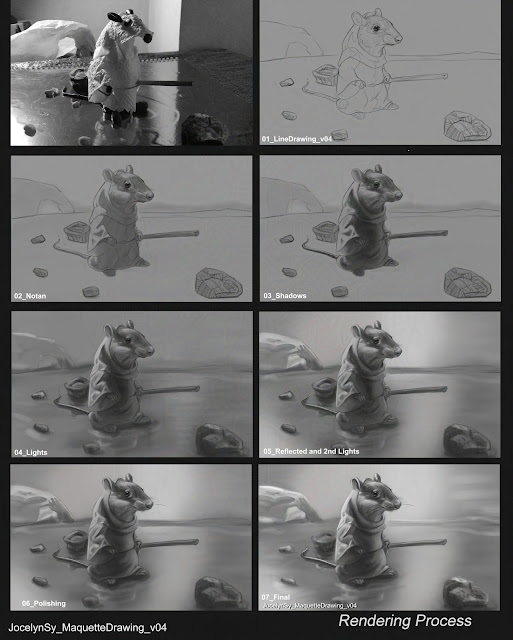
     Then I lighted this using my desk lamp as the primary light source and some window light  for the secondary one.  I took lots of photos using my phone. Then converted it to black and white. The course deals with light and shadow so I eliminated any color for now to simplify things for me.  This is how it turned out..


     Then, it's time to draw.  I drew a few versions of this rat. Not relying too much on the same shape as that of the maquette.  I started out with a similar shape, but after a few iterations, the head design evolved into a more mouse-like appearance . I opted to finalized the latest iteration.


     Once the final design was settled, I started the painting process.  Having this maquette as a lighting reference helped me in drawing the light and shadow patterns without much pain. The shadows of the folds in the robe sleeve was interesting to look at, so I stayed close to the design of it. For the costume, I redesigned it to look more like a hooded robe. As for the composition, I also stayed close to the reference, with only a few shape changes in the rock cave in the background.  The biggest  rendering challenge here was in applying the light and shadow patterns on the head, which deviates from the maquette's head shape. Keeping in mind the 3D aspect of the mouse head, I had to re-visualize how light and shadow would fall on it using the light direction from the reference.


      So here's what came out of it. a mouse monk in a cold icy setting.  I submitted this for review, but Dorian is still on a long break until April, so feedback/critique for this is yet to be made.  While waiting, I tweaked this further and added some textures on the costume, and background.  I'm also learning some digital painting tricks, and adding textures seemed like a good excuse.


     Out of curiosity, I went ahead and added some color to it.  Since I'm yet to learn how to paint in color properly, I don't have much confidence to paint in color just yet.  So for the meantime, I settled in just colorizing this like a wash. To emphasize the coldness of the place I limit the color palette to de-saturated greens and blues and a few yellows for the secondary light source and the mouse's head color.


   This is done for now, until this is reviewed by Dorian.  Till then, I'd say I'm pleased with the result.