Sunday, November 10, 2013

Wk 4 Digital Painting - Full Body Painting and Animal Heads

This is the fourth week of my digital painting course.  By this time, I'm already comfortable painting digitally. I'm gradually learning Photoshop tools while completing a painting.  Our topic for the week was to paint a full body figure with drapery.  From the different statues given to us, we're to choose one, or use the previous statue we did from the previous week 1 and 2 assignment.

I started with my previous Vienna Statue sketch from week 1, using the finished head painting of week 2 and reduced it to the right size to continue painting the whole statue. I blocked out the body for a day, and planned to finish it the following day.  But I got sick and wasn't able to finish it.  The day after, I was a little bit better and tried to resume working on it.  But I got tired and bored with it so I didn't finish it.  This is the farthest I went with it..... (click to enlarge)

Unfinished Vienna statue painting


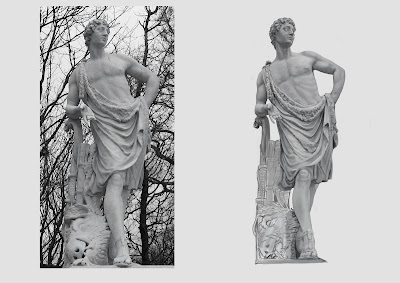
 I need something new this time, so I chose this statue for this week's assignment.  A man for a change.

Rough sketch

This week we're encouraged to try some custom brushes we've downloaded from last week.  After I unsuccessfully tried out the Fur brushes during the week 3 assignment, I decided to give this Shaddy's Brushes collection a chance this time.  For this full body painting, I used the brush called Tyrion Lannister. 

Every now and then, I would flip the image to get a fresh eye, which really helps in catching any off-proportions.  I also made the background lighter in color, similar to the photo, as I was having a difficult time seeing the correct value. Once it is finished, I switched the background back to black.  Here's the Full Body Painting in progressive versions.


Later on, I found that the statue looks too pale on a black background so I adjusted the overall contrast to match the black background.  Here's the finished painting...


This took me 2 days to finish, Not counting the extra day I spent on the Vienna Statue. This is becoming the time frame it would take me to do one painting.  

The next half of my assignment was to paint herbivore animal heads - a horse and a cow or bull.  For the horse, I used the Khal Drogo and Tyrion Lannister brushed from the Shaddy's brush collection. Here's the painting in progressive versions...


 I still haven't figured out how to use the custom Fur brushes according to how I want it to, so I just used the brush no 5 and 6 for the hair and fur again.

Next was the cow head.  Same as the horse, I used the same brushes to complete this painting. Here they are in progressive versions...


Yey! I finished all of my assignment with still a day to spare.  I'm really pleased with my speed so far. One thing that I realized this week, is that the human and animal anatomy lessons I have been trying to learn over the years before, is paying off now, Understanding what's underneath those skins is really useful and actually helps me to be able to do the painting more quickly, and hopefully, more convincingly.

More paintings in the coming weeks.  Till then....

To see previous weeks, click here : Week 1, Week 2, Week 3

Sunday, November 3, 2013

Wk 3 Digital Painting- The Head In Color And Painting Fur

My digital painting journey continues....

Continuing with last week's lesson on value study, this week our assignment is to paint portraits in color, using two methods. One is adding colors using layers. The other is color mixing with brushes.

In the first method, I chose William Adolphe Bouguereau's Le Petite Mendiante as my Master study.  In this method, we start with a black and while value study , then on another layer we will add color.  Since I did the value study of a Vienna statue last week, I was pleasantly surprised that I was faster with this assignment.  I almost managed to finish this value study in a day!  (It took me more than three days with the statue.) I was really pleased.....(click to enlarge)


The following day, I added more refinements and details to the value study, thinking that if I do more at this stage, adding color to it would be faster. So I added the wrinkles on her blouse and worked on her tones further, flipping it often to catch any distortions and off-proportions.  I'm really getting the hang of working in Photoshop with it's Distort and Warp tools. I'm still just using two basic default brushes here, brushes 5 and 6.  Now that it's done, it's time to add colors.


So the same day, I added the colors.  Like I suspected, it was quicker. I glazed the colors on top with another layer which is set to Color mode.  Although, I realized that some colors became muddy as we have been told, so it wasn't as simple as I originally thought. I added another layer and mixed and blended the colors normally to achieve the correct color.


I made further adjustments and finished it off the same day. I have to make sure I have enough time to do the other method and there's still the animal paintings to do as well.  So here's the final version.


The following day, I started with the second method, where we start with colors right away. Because I haven't done this method before, it seem to take me longer. I cheated with the color palette where I used the color picker to pick the colors off the original, instead of picking it myself.  I think if I gain more experience with this method, it might prove to be a faster method. For this study, I chose Lord Frederic Leighton's Biondina painting.  Here's the rough version...


Continuing still the same day, I worked on it further, adding details on the hair and clothes and refined the face.  I was trying to capture the likeness, but in the end, the closest I can get her to look like is..... her older sister. haha.
I have to let it go, or I'll never finish the other half of my assignment for the week.


The next day, I now focused on animal painting, where we were to paint two animals - a long-haired and a short-haired.
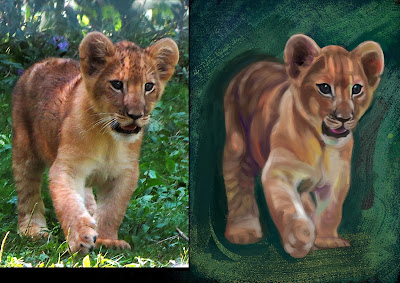
I chose a cute lion cub for the long-haired animal. I guess after spending 2 days painting directly with colors, gave me enough familiarity and practice that I managed to finish this painting in a day.  I'm really pleased with my speed and the outcome. Here's it is in progressive versions....


Then for the last one, a short-haired animal, I chose the horse.  And just like the lion cub, this also took me a day to finish.


With fur, there are custom brushes that we can use. Unfortunately, my Photoshop version isn't compatible with my instructor's brushes so I downloaded those I found elsewhere.  I'm still trying to figure out how to use those fur brushes. I found them not suited to how I want it to look,because the strokes are in the wrong direction.  So I just used some of it sparingly on the horse, but not on the lion cub.  Maybe I'm using it wrongly, I will have to ask Anne, my teacher about that.

In a matter of days, I think that I'm really adapting to the second method of painting quickly.  This is really exciting for me.  I can't wait to learn more....

 To see previous weeks, click here : Week 1, Week 2


Saturday, October 26, 2013

Wk 2 Digital Painting - Head Value Study And Animal Drawing

     For the longest time, it's been my desire to learn how to paint digitally in Photoshop. Now that I have the time, I started taking an online digital painting course last week. Even though I'm not exactly a beginner in drawing, I am a beginner in digital painting especially in Photoshop.  I am pleasantly surprised, that I became comfortable with Photoshop quickly, after learning a few tips on how to navigate the interface. That week was sort of a warm-up.
     
     This week, I got a taste of how it's like to paint digitally.  Oh boy.... it's was quite a challenge. I didn't realize that painting takes longer, and requires a lot of patience.  After watching my instructor's painting demo, I started to do the assignment,  Using the sketch of the Vienna statue that I did last week, I scaled it up to just focus on the head for this week.

     My first difficulty was blending.  I didn't know how to digitally blend the colors using the brush tool and the color picker.  I spent hours and hours struggling on this till my hand hurts. This was what I managed that day... She looks angry at me already. Haha... (click to enlarge)


     The following day, I worked on it again,and managed to get the hang of blending that I was pleased with the outcome. I managed to soften her expression.  At least she doesn't look angry anymore. I blocked out the hair and arm roughly. This allowed me to focus on other areas, when I got tired of working on the face.


      On the third day, I continued on. The face keeps evolving as I work on it. At one point, I painted the lips much too luscious, it looked like Angelina Jolie's lips.  I have to tone it down.  A good tip Anne told us is to flip the image to get a fresh eye. I knew that, but forgot about it until Anne mentioned it. That helped a lot. I saw some distortions and managed to fix it on this version below.


        I was pleased with what I've done with the head so far and decided to take a break from it for awhile. I decided to work on the other part of our assignment, which was to draw animals in interesting poses on a black background. So I did this....  
                                               Photo Image by Leslie Thief
      The following day, back to the head painting, I decided to finish it up already, because there's more animal drawings to do. I worked on the hair, neck and arm area, plus a bit of the background, I tried to fix the face a bit of any distortions.  By this time, my hand started to really hurt, due to my previous RSI.   I decided to leave the head study for now and proceed with the animal drawings, and if there's still time, I will work on it later.  At this stage, I was happy with the result.

                             
     So after painting intensely for a few days by now, drawing animals was a welcome break.  I enjoyed drawing them that I drew 6 more animals over two days.
                               
Photo Image by Draco Art Stock
Photo Image by Bahaloo
Photo Image by Chunga Stock
Photo Image by Hot N Stock
Photo Image by Deseo Nocturno
      Whew.... I've finished all the assignment for this week and I still have a few days left to spare.  So, I thought of going over the head study again and see if I can polish it up a bit. After a few hours of tweaking it, I decided to let it go.  I don't want to mess it up unnecessarily.    So here is the final head value study.

     It's been a very intense and productive week for me, I started out fumbling over how to blend the colors. After hours and hours spent just figuring it out, I managed to get the hang of it by the end of the week. Not too bad.... It's not perfect by any means, but for a start, this is really, really promising. :)

     To see previous weeks, click here : Week 1


Saturday, October 19, 2013

Absolutely Enjoying This...


    I'm at it again - another online drawing course!   I'm taking a break from animating, now that I'm out of work and jobless again. So I should just as well use this time to hone and improve my drawing skills, and learn how to digitally paint, while avoiding getting depressed over the instability of the animation industry, and my joblessness.

    So...this time I enrolled in a Digital Painting 8-week course.  I have been waiting for a chance to do this course to finally learn how to handle Photoshop. I have been putting off learning Photoshop, because after having to learn a very technical 3D program Maya before and found it hard, learning another digital program seem daunting to my non-technical brain.

     I had some initial confusion and unfamiliarity with the user interface of PS CS5, compared to that of my instructor's CS6.  The good thing is she helped me immediately through live chatting on how to navigate and learn a few tips to help me on our first week's assignment,  After that, I was able to managed well this first week.  Fortunately for me, Photoshop isn't that scary after all.  I'm presently using Photoshop CS5 Trial version. If I eventually find that this is a program I would like to use for drawing and painting, then I'll probably invest in the full version later on.  

     I chose this course because it both involves figurative and animal drawing.  And I thought what could be a better way to learn Photoshop than to learn it by drawing and painting humans and animals at the same time, which I both like. So I'm sold! 

     For the first week, we're asked to do some exercises doing figure and animal drawings to get use to drawing with a tablet while using Photoshop.  Fortunately for me, I don't have to struggle drawing digitally with a tablet, because I have a Cintiq.:P

       These are what I've done so far.....(click to enlarge)


Photo Image by Cyborg Suzy Stock
Photo Image by Lesley Thief
Photo Images by Draco Art Stock


Photo Image by Tala Stock


       I did these quick sketches below, using the Animal Practice tool from this website - Figure and Gesture Drawing  
Setting the timer for 2 minutes,


         And here's a preparatory sketch of a Vienna statue, for our week 2 lesson. Can't wait....


            ***Human and animal references used here are from http://artists.pixelovely.com ; http://characterdesigns.com; http://www.deviantart.com
    

Tuesday, July 23, 2013

Drawing Bambi's Head

     Disney's animated classic " Bambi " is one of my favorite Disney movie.  When I was at Disney Australia, I had a chance to worked on the sequel "Bambi 2", but I didn't have a chance to animate Bambi. At that time, I was afraid to tackle that character, not having much experience animating 4-legged animals before, and with the high quota expectations, I didn't think I could do a good job with that character, so I chose to work on Thumper instead, another favorite of mine.  I enjoyed Thumper a lot and no regrets.  Now that I'm reminiscing about it, I thought of doing some drawings of Bambi just for the fun of it. No pressure.
       So here's my accelerated speed- drawing videos of Bambi's head.   Ooh... how I wish I really draw that fast.


Monday, June 17, 2013

Final Week - Fundamentals Of Character Design

      For the final week of the course, the topic was Appeal And How To Achieve It.  Clear and easy to read silhouette is the key.  Combining all the principles we've learned for the past 7 weeks, we're to do the following for the final assignment, focusing on appeal:
   1) A Raccoon that is a leader and a hero archetype, without costume,   Or a steampunk female that is a leader and hero archetype. Showing the rough and clean version.  I chose the raccoon.
   2) Rough design of two characters interacting: 
Female with an elephant- theme and story moment is students idea.  
Focus on making an appealing situation based on the clarity of silhouette of two characters as one complete strong compositional image and stimulating interaction, creating an intriguing storyline through a single image .All of this in order to make the viewer wanting to know more of what is going on.  Style is students choice.

     Here's what I've done..(click to enlarge)


Tuesday, June 11, 2013

Week 7 - Fundamentals of Character Design

      "Character Staging and Setup"  was the topic for week 7.  The assignment for the week was to do two master copies of Frank Frazetta's work in black and white, using only two values, and transitions.  And create two scenarios, that demonstrate  good composition, pose, camera placement,spacing, lighting,
1. Character detained, imprisoned, alone and hopeless (students choice of subject and setting)
2. Character heroic, victorious, superior (students choice of subject and set)
Plus a page of hands and feet.
    
     Here's what I've done.. (click to enlarge)


Monday, June 3, 2013

Week 6 - Fundamentals Of Character Design

     Design Details and Shape Breakdown was the topic for week 5.  Nico Marlet's work is the inspiration for the week.  Our assignment was to do a master copy of one of his work,  and we're to design a dragon and his rider, in two styles -  one is a more cartoony graphic style, and another in in a more realistic style. 

     Here's what I've done...(click to enlarge)